Manage Service Principals
Using the FAPI Credential Validation
The set of FAPI credentials have been created and now are to be used. You have the following items:
- Passphrase to decrypt .key file
- .KEY file
- .CRT file
- Client ID—can be obtained from PortX Integration—Manager Secure Module—Manage Service Principals Page which has a column labeled “Client ID” (shown in Figure 83)
- Tenant Name

The “Example_FAPI-dev” was created from the information in Figure 79.
Validate FAPI Credentials
Validation is optional.
The goal is to successfully request a new access token.
Figure 84 shows an example of a private key when opened in a text editor.

Figure 85 shows an example of a certificate when opened in a text editor.

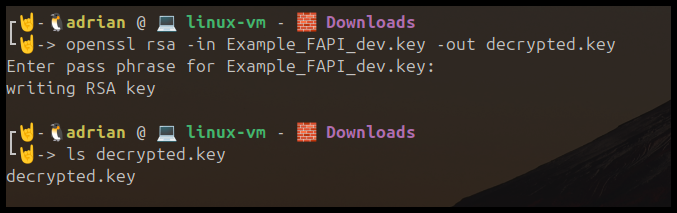
Optional—Manually Verifying and Decrypting .key file using command rsa through command line
This step validates that the passphrase is correct and the key can be decrypted. However, the next step, the next python script decrypts it before requesting the token.
First decrypt the key file using the passphrase.
Command line command to test passphrase to decrypt the key.
openssl rsa -in cert.key -out decrypted_client.key
Credentials Usage
Generating the one-time JWT to interact with the API.
Credentials Validation—Issue test token using automated script (Python)
Python example:
pip install --upgrade PyJWT
pip install --upgrade requests
pip install --upgrade urllib3
pip install --upgrade cryptography
NOTE: Please note from Line 13 (after "Configuration Begin") to Line 18 (before "Configuration End") the values are specific to the client, and your own information needs to be entered in Line 13 through Line 18.
import copy
import json
import jwt
import time
import uuid
import requests
import urllib
from cryptography.hazmat.primitives.serialization import load_pem_private_key
from cryptography.hazmat.backends import default_backend
from cryptography.hazmat.primitives import serialization
from cryptography.hazmat.backends import default_backend


## Configuration - BEGIN ##
realm_name = 'demobank'
client_name = 'Example_FAPI_dev'
client_id = '32ec103f-6217-42d8-9c4c-c5e71547ad39'
certificate_file_path = 'Example_FAPI_dev.crt'
encrypted_key_file_path = 'Example_FAPI_dev.key'
pass_phrase='test1234'
## Configuration - END ##


##################################################################################
current_path = f"."
current_time = int(time.time())
realm_url = f"https://auth.piam.tenants.portx.io/realms/{realm_name}"
decrypted_key_file_path = 'decrypted_client.key'
####################################################################################
# openssl rsa -in ./client.key -out decrypted_client.key
# Read the encrypted private key
with open(encrypted_key_file_path, 'r') as key_file:
    encrypted_key = key_file.read()
# Decrypt the private key using the password
private_key = load_pem_private_key(
    encrypted_key.encode(),
    password=pass_phrase.encode('utf-8'),
    backend=default_backend()
)
with open(decrypted_key_file_path, 'wb') as key_file:
    key_file.write(
        private_key.private_bytes(
            encoding=serialization.Encoding.PEM,
            format=serialization.PrivateFormat.PKCS8,
            encryption_algorithm=serialization.NoEncryption()
        )
    )
with open(decrypted_key_file_path, 'r') as key_file:
    decrypted_key = key_file.read()
# Define JWT payload
headers = {
    'alg': 'PS256',
    'typ': 'JWT'
}
payload = {
    'iss': client_id,  # Issuer - this should be your client ID
    'sub': client_id,
    'aud': f'https://auth.piam.tenants.portx.io/realms/{realm_name}',  # Audience - your Keycloak server URL
    'jti': str(uuid.uuid4()),
    'exp': current_time + 60,  # Expiration time (60 seconds from now)c
    'iat': current_time,       # Issued At time (current time)
}
try:
    jwt_token = jwt.encode(payload, decrypted_key, algorithm='PS256', headers=headers)
    print("Generated JWT:", jwt_token)
except Exception as e:
    print("Error generating JWT:", str(e))
    raise
# Keycloak token endpoint
token_url = f'https://auth.piam.tenants.portx.io/realms/{realm_name}/protocol/openid-connect/token'
# Prepare the request data
data = {
    'grant_type': 'client_credentials',
    'client_assertion': jwt_token,
    'client_assertion_type': 'urn:ietf:params:oauth:client-assertion-type:jwt-bearer',
    'client_id': client_id,  # Ensure this is the correct client ID
}
client_cert_data = open(certificate_file_path, "r").read()
client_cert_data_enc = urllib.parse.quote(client_cert_data)
print(client_cert_data_enc)
headers = {
    "Content-Type": "application/x-www-form-urlencoded",
    "Accept": "application/json",
}
headers_auth = copy.deepcopy(headers)
headers_auth.update({"X-Client-Cert": client_cert_data_enc})
# Make the request
response = requests.post(token_url, headers=headers_auth, data=data, cert=(certificate_file_path, decrypted_key_file_path), verify=True)
# Check the response
if response.status_code == 200:
    print("::::::::::::::::")
    print("Access Token:", response.json().get('access_token'))
    decoded = jwt.decode(response.json().get('access_token'), options={"verify_signature": False})
    print("\nDecoded JWT Payload (using PyJWT):")
    print(json.dumps(decoded, indent=2))
else:
    print("Failed to get access token:", response.status_code, response.text)
Expected Result
JWT

Optional Validation in jwt.io
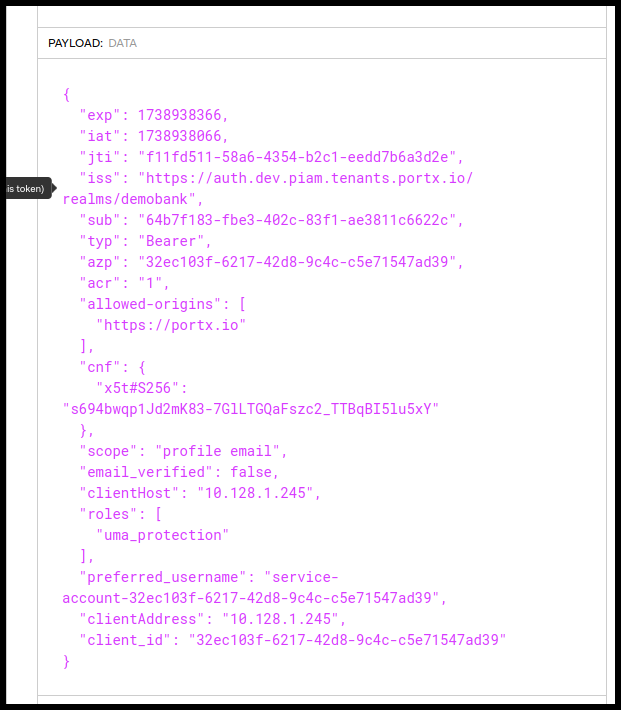
Figure 88. Optional Validation in JWT.io